How not to ikat
A week ago (yeah, yeah, I'm behind), The Knitist and I finished the second part of our "Machine Knitting to Dye for" class over in Berkeley with Nancy Roberts. This class was a fabulous adventure in dyeing, done with all the right equipment and on-site tech support, thanks to Nancy's precision, artistry, and awesome workshop space.
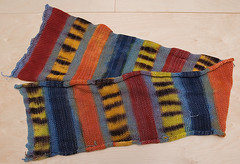
What you see here is my final project for the class: a great big piece of machine knitted fabric in 2 strands of sock yarn, dyed in precisely calculated lengths to match up with a sock pattern Nancy uses. The red at the top will be the toe and the green/black bit at the other end will be the cuff. the big orange bit at the fold will be the heels.
I suspect there are issues with this piece (remember, it's a class. It was a learning experience!). I think the red end reveals totally different dye take-up in that one stripe than everywhere else. I suspect that end is 2 100% wool strands, where everywhere else through the swatch I used 1 strand of 100% wool and one wool/nylon blend. See the 2nd and third red stripes? Totally different dye take-up!
Also, I wanted to use this ikat dyeing technique -- which is a name for the black bits you see traditional Japanese or Central American dyeing. I loved the one-stitch-in-each-color sections in yarn like Socka Fortissima Colori and wanted to try this out. Tragically, everyone, including me, kept forgetting about that step, so I neglected to use the thickener on 3 of 5 colors, which would prevent bleeding, and I applied the black dye BEFORE working in the base colors, so my blacks are not crisp & clean, but have been mushed up into the surrounding colors. Actually, I didn't really know what pattern to use in applying the ikat dye, so I have no idea what this yarn will look like un-knit or re-knit. All a big experiment!
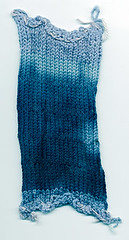
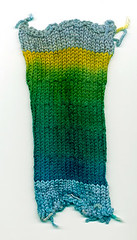
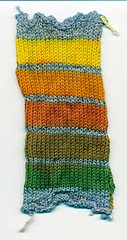
But even if the socks don't turn out, I learned a LOT about dying & color. Here are my three samplers, which I dyed before choosing the colors for my project. We knit these swatches in our first class session, then came back two weeks later to dye them. In order, we have a 1 color, 2 color and 3 color sampler.I was really glad Jeni talked me into taking this class, and I would go back in a heartbeat. I know I will never have dedicated equipment (dye pots, syringes for measuring, paintbrushes in many sizes, ikat dye, cooktop reserved only for dyeing, steam table for cooking the dye... Yipes!). It was so much easier learning the principles of dyeing in a space with all the right equipment rather than trying it out in my kitchen and worrying about contaminiation. So, thanks Jeni, thanks Nancy, for an awesome day.


3 Comments:
What a cool process. She's put a lot of work into working out all of the details. I can't wait to see the socks!
Noo no no no no, thank YOU for an awesome day! It would have been awful to have to drive up and down the Nimitz all by myself. And I would have had no one to go to Stash, Peets and La Farine with, after class :)
Mary,
Thank you for your kind words about my class.
No need to apologize for how your yarn came out. I think it's so cool. In fact, I'm so proud of your work, I've sent a few knitting/dyeing friends a copy of the photo that I had taken of it. They were equally impressed. You must have forgotten that I warned everyone that in the knit and dyed stage, the piece may look unattractive; but those ugly ducklings will turn into swans when re-knit.
Nancy
P.S. And I don't think you mixed your yarns. The wool/nylon combo yarn can take the dye a little differently, but your re-knit piece will be very striking. Be patient. The black ikat stripes did not merge too much, trust me on this. If you're not happy with the end result, I'll be happy to trade you for a pair of my socks!
Post a Comment
<< Home